NopBridge Control Center
NopBridge Control Center is the Windows administration workspace by Bitlogika for NopBridge. It is designed for administrators who manage one or many nopCommerce stores and want faster catalog, source, mapping, run, and troubleshooting workflows than a browser-only admin experience.
Use NopBridge Control Center when you want to:
- Connect multiple stores from one desktop app.
- Review license, update, source, profile, and run health.
- Create sources and profiles without jumping between web tabs.
- Use a guided wizard for imports and exports.
- Manage catalog data with product preview, pictures, attributes, specifications, categories, and bulk actions.
- Drag products onto categories for faster catalog organization.
- Generate AI mapping recommendations and manually review field rules.
- Run dry runs and live runs with traceable logs.
Dashboard
The dashboard is the daily operations view for connected stores.
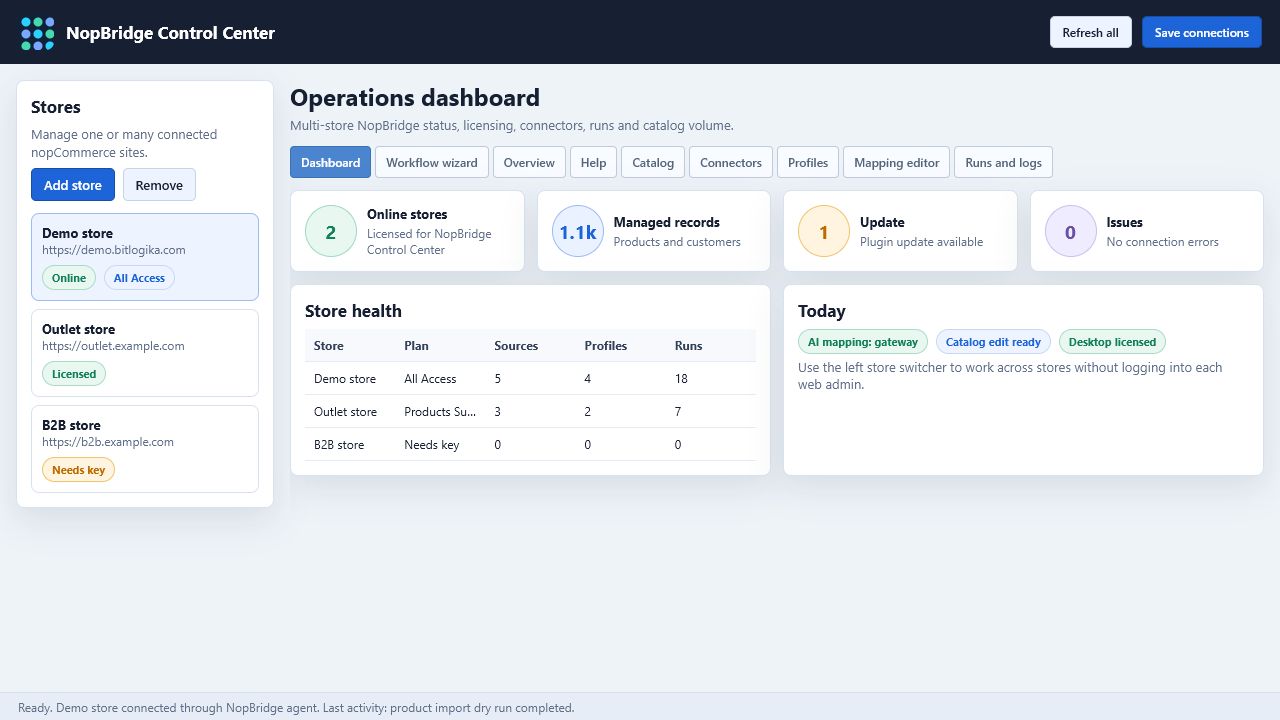
Use it to check:
- Which stores are online.
- Which stores are licensed for NopBridge Control Center.
- Managed record volume.
- Update availability.
- Connection issues.
- AI gateway status.
- Recent source/profile/run counts.
The left store list is the main context switcher. Select a store first, then every tab works against that selected store.
Workflow Wizard
The wizard is the clearest path for new imports and exports. It exposes the same real settings used by the full tabs, but keeps the administrator inside one guided experience.
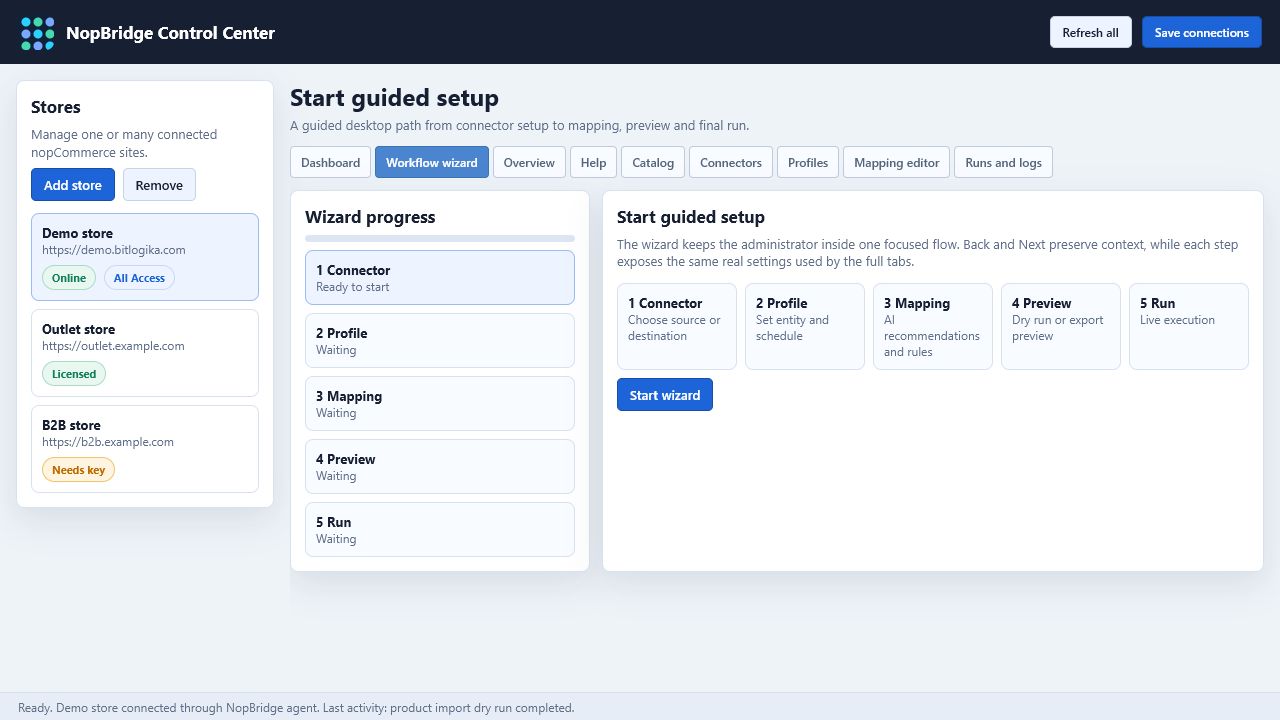
The wizard is useful when:
- A user is creating a workflow for the first time.
- A support person is walking a customer through setup.
- A source has changed and mapping needs to be rebuilt.
- A dry run needs to be reviewed before live execution.
- A store has many profiles and the user wants a focused path.
Step 1: Connector
Choose or create the source/destination connector.
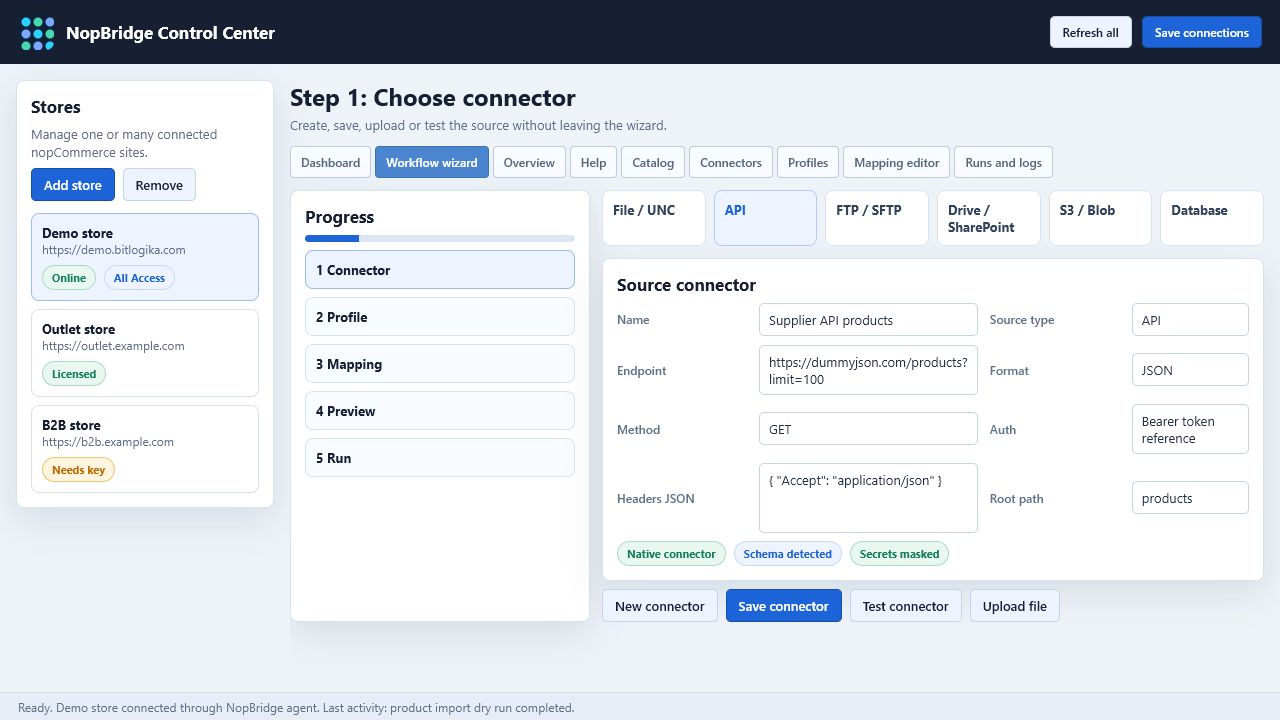
The connector step supports the same patterns as the web plugin:
| Connector | Use |
|---|---|
| File / UNC | Local files, shared folders, CSV, XLSX, XML, JSON |
| API | HTTP endpoints with method, headers, auth type, and response root path |
| FTP / SFTP | Supplier or partner feed folders |
| Drive / SharePoint | Business files in cloud document storage |
| S3 / Blob | Object storage feeds and export targets |
| Database | Direct database reads when configured |
Actions in this step:
- Create a new connector.
- Save connector settings.
- Test the connector.
- Upload a local source file when the store agent supports file upload.
- Detect schema from source samples.
Step 2: Profile
The profile step decides what the connector will do.

Profile fields:
| Field | Meaning |
|---|---|
| Direction | Import or export |
| Entity | Products, Customers, or another licensed workspace |
| Connector | Source or destination used by this profile |
| Schedule | Manual, hourly, daily, or weekly |
| Run only if source changed | Avoids unnecessary repeated runs |
| Backup/delete source options | File workflow safety and retention settings |
For first setup, keep the profile manual until dry run and logs are clean.
Step 3: Mapping
Mapping loads source fields, target fields, AI suggestions, manual mappings, and generated rules in one place.
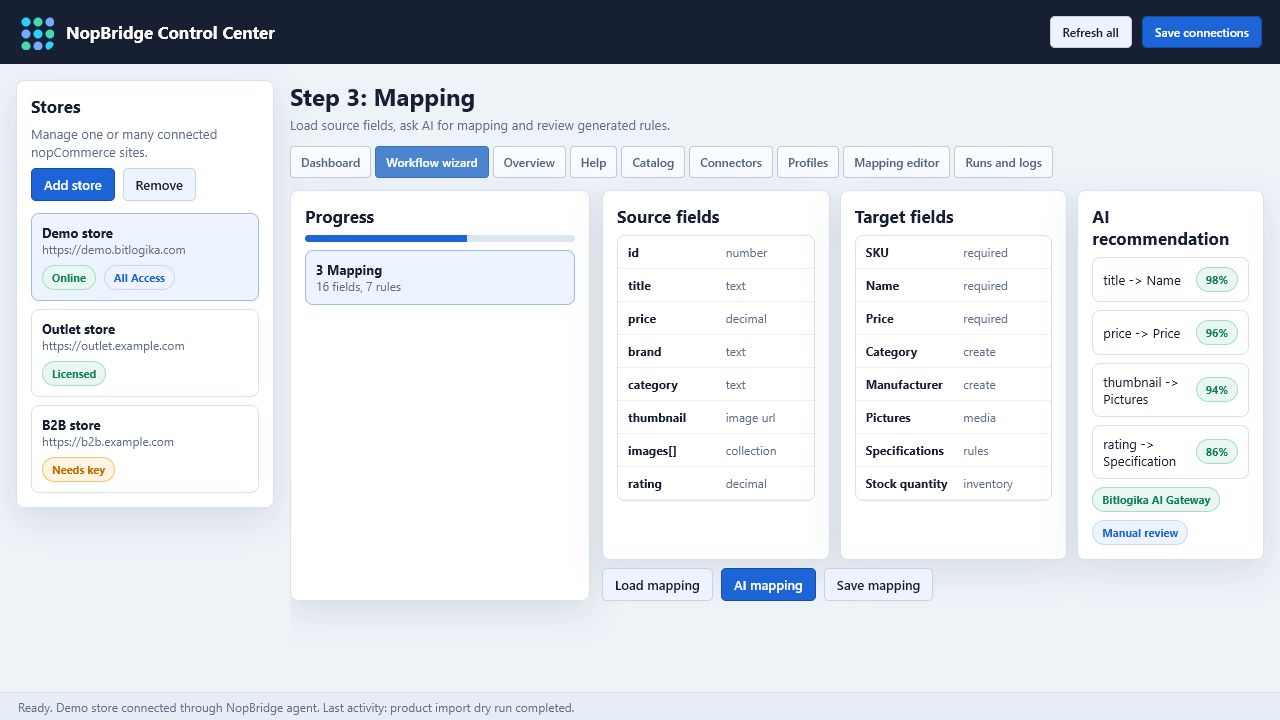
The recommended mapping flow:
- Load mapping workspace.
- Generate AI mapping if available.
- Review provider and model status.
- Review confidence per field.
- Confirm required fields.
- Confirm category, image, attribute, and specification rules.
- Save mapping.
AI mapping can start the work, but an administrator should review every low-confidence or high-impact field.
Step 4: Preview
Preview runs a dry run or export preview before anything is written.
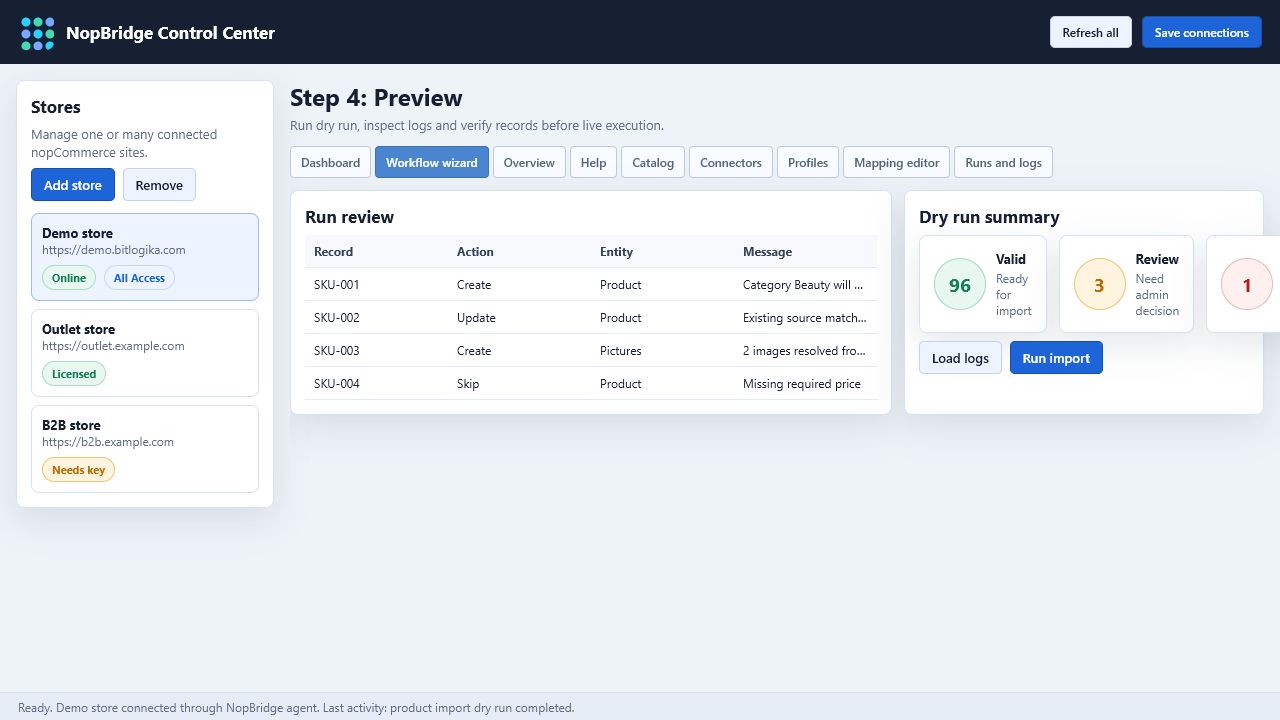
Review:
- Created count.
- Updated count.
- Skipped count.
- Failed count.
- Category creation.
- Picture resolution.
- Duplicate detection.
- Row-level warnings.
If this screen does not look right, go back to mapping or connector setup.
Step 5: Run
The final wizard step runs the real job.
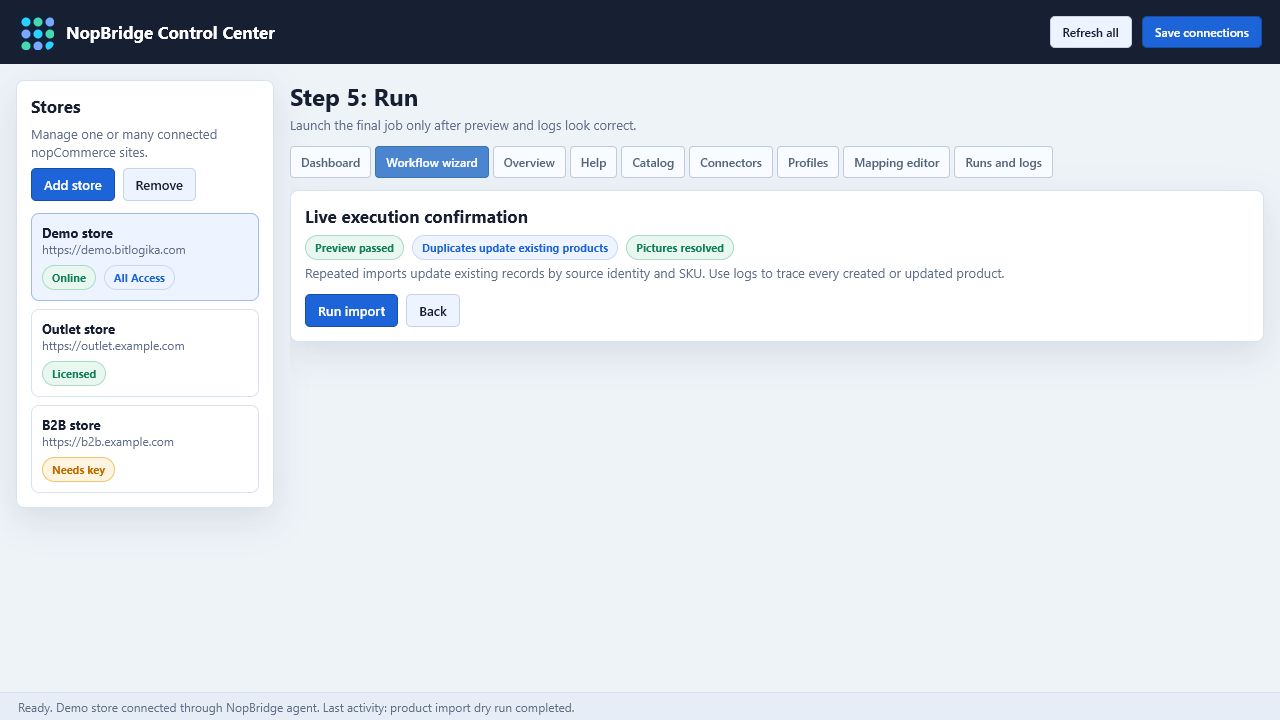
Use this step only after preview is accepted. For repeated imports, NopBridge should update existing records based on source identity or SKU instead of creating duplicates.
Overview
The overview tab summarizes selected store readiness.
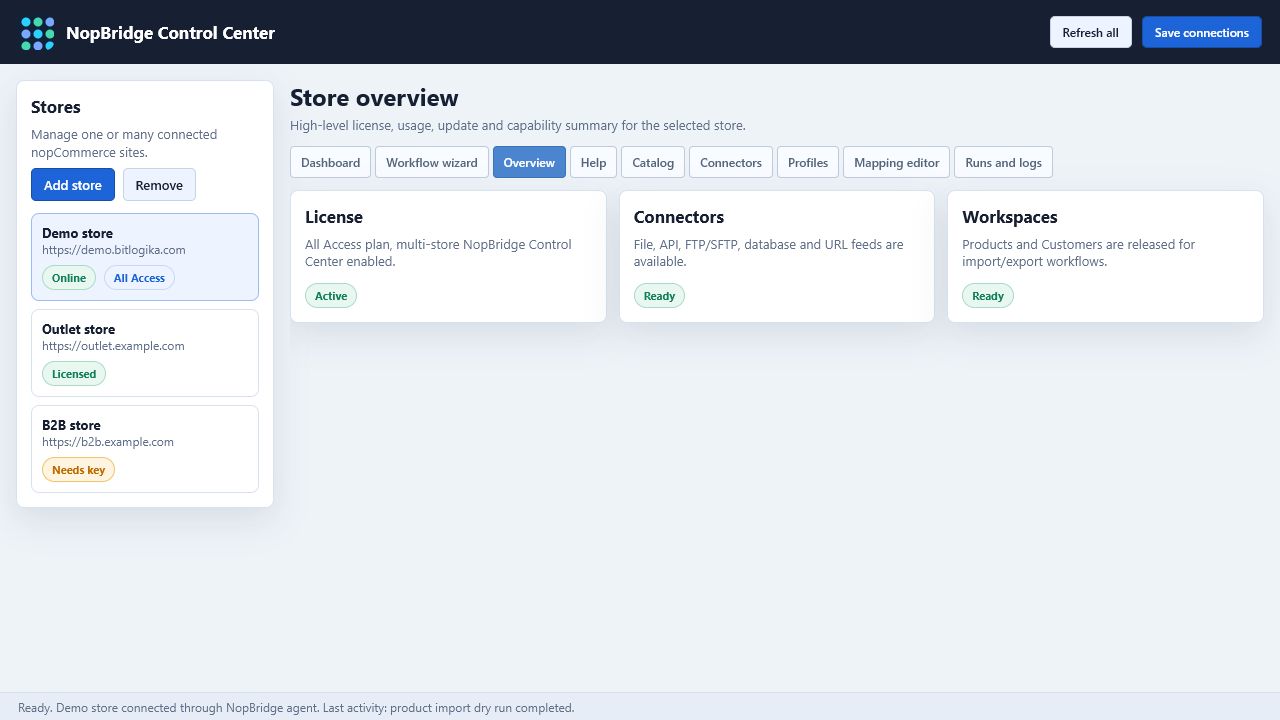
Use it to confirm:
- License status.
- NopBridge Control Center access.
- Enabled workspaces.
- Connector availability.
- Store/version status.
- Update status.
This is a good place for a support person to start before asking the customer to open deeper tabs.
Help
The help tab explains the most common workflows without leaving the desktop app.
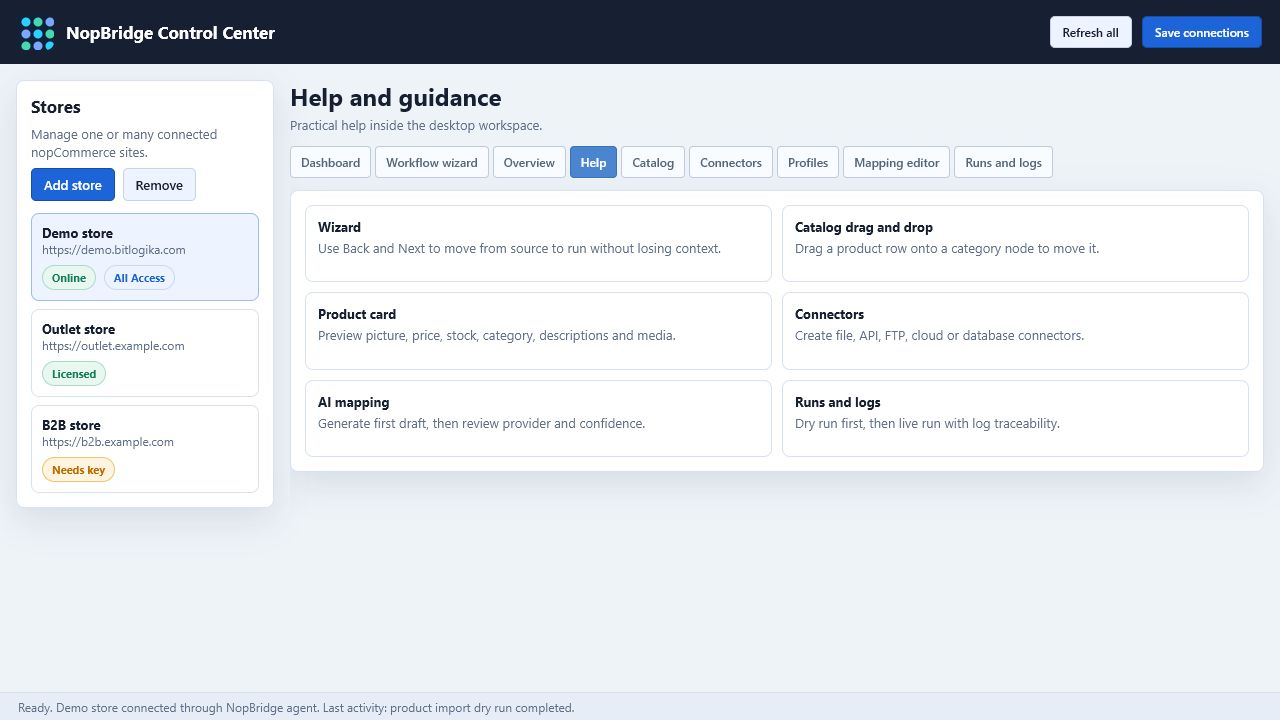
Help should cover:
- Wizard use.
- Connector setup.
- Catalog drag and drop.
- Product card editing.
- AI mapping.
- Dry run and logs.
- Licensing.
- Troubleshooting connection errors.
Catalog
The catalog tab is the desktop catalog management workspace. It should feel faster than web admin for common admin work.
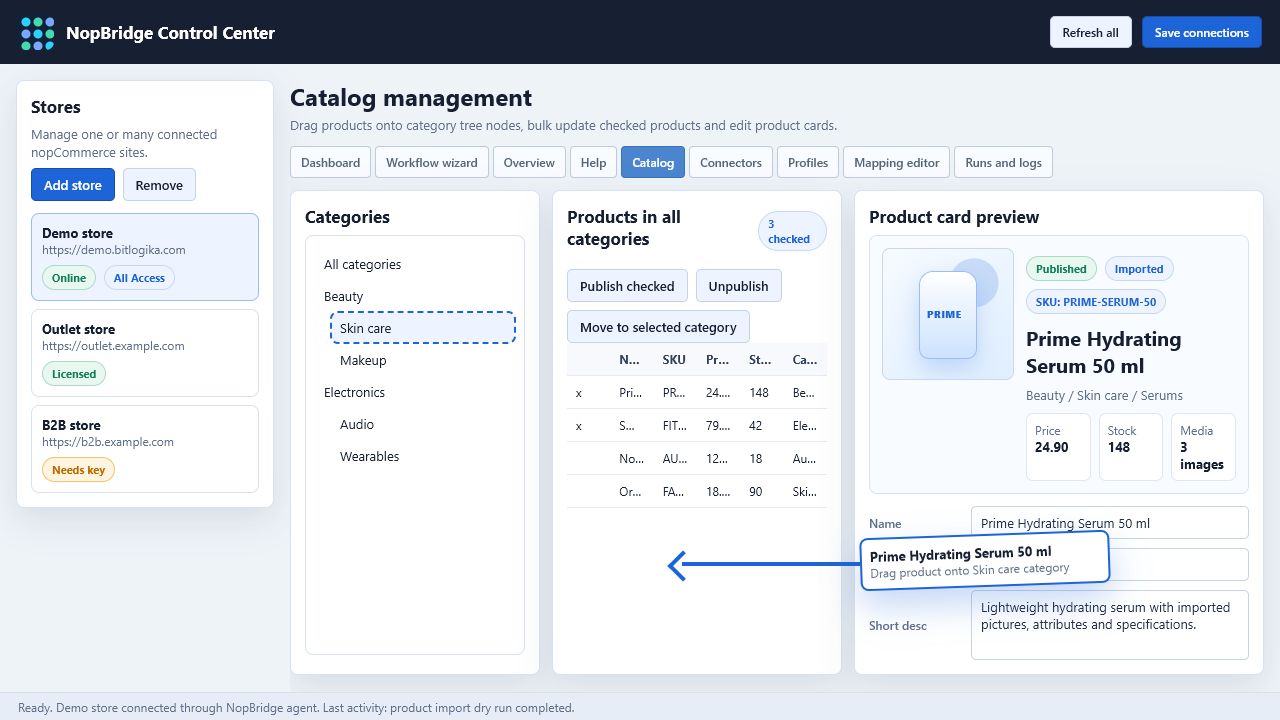
The catalog workspace contains:
- Category tree.
- Product list.
- Product card preview.
- Product Summary, Media, Attributes, Specifications, and Category editors.
- Bulk actions for checked products.
- Drag and drop from product list to category tree.
Drag and Drop Category Management
To move a product:
- Select or search the product.
- Drag the product row from the product list.
- Drop it onto the target category in the category tree.
- NopBridge Control Center updates the product's primary category through the NopBridge agent.
- Refresh or reopen the product card to confirm the category.
Drag and drop is best for quick catalog cleanup, especially after imports that create products before categories are fully curated.
Product Summary
The Summary tab gives the administrator a product card instead of a plain form.
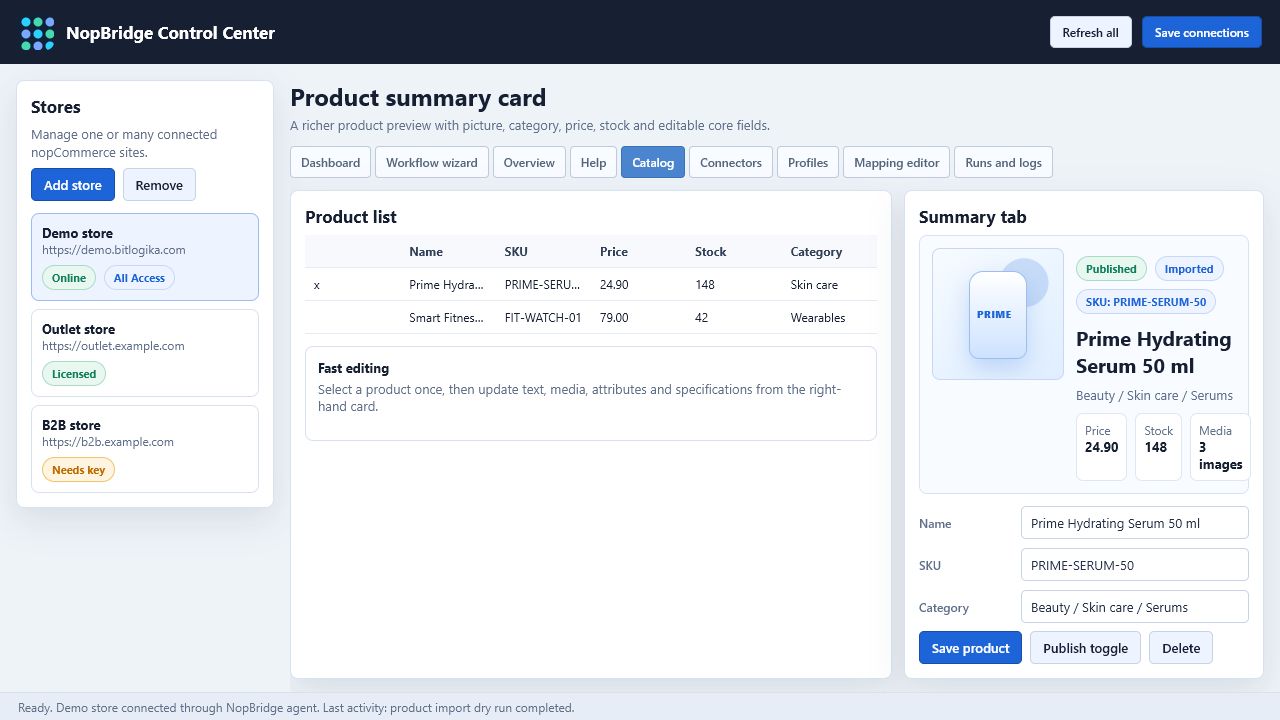
The preview should show:
- Main product image.
- Published status.
- SKU.
- Product name.
- Category path.
- Price.
- Stock quantity.
- Image/attribute/specification counts.
- Core editable fields.
Use this tab for quick product review after import and for small manual corrections.
Product Media
The Media tab manages product pictures.
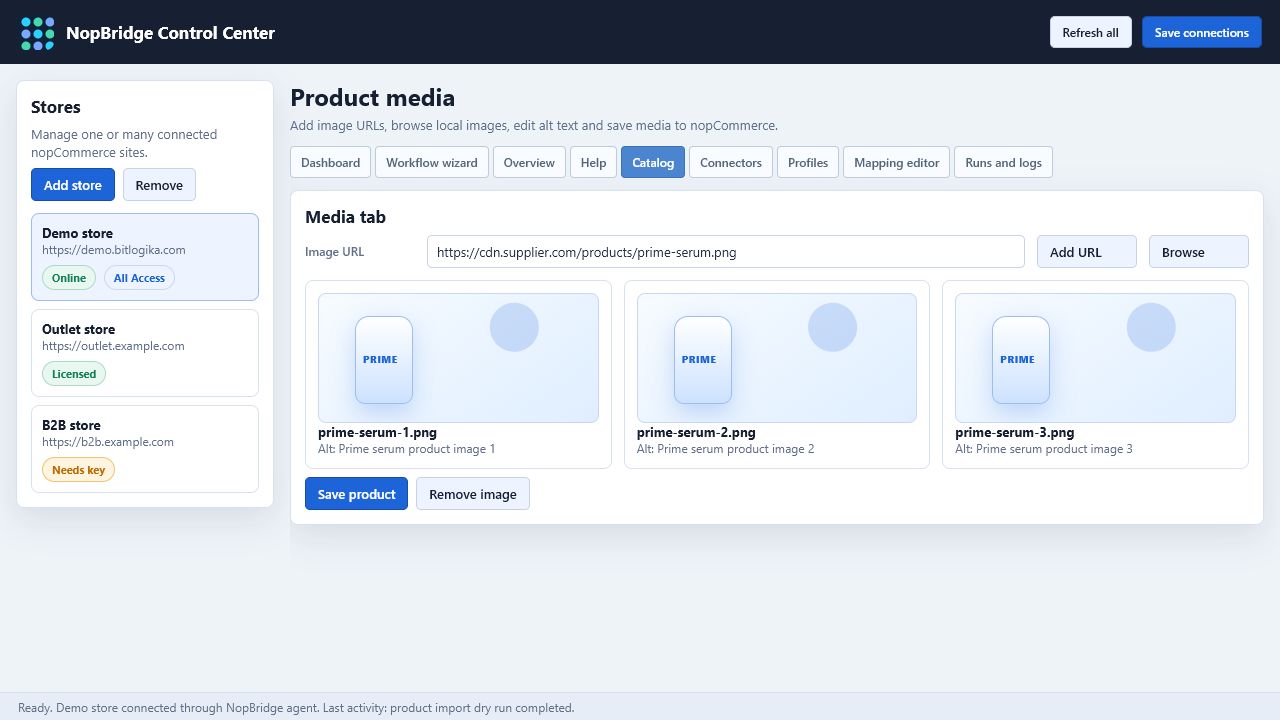
Supported actions:
- Add picture by URL.
- Browse and attach a local image.
- Review thumbnails.
- Edit alt text.
- Edit title text.
- Change display order.
- Remove picture.
- Save product media through the store agent.
Image sources can be different from the main product data source. For example, a CSV can map product data while pictures come from HTTP URLs, FTP paths, file paths, or cloud references.
Product Attributes
Product attributes are customer-selectable or variant-like values.
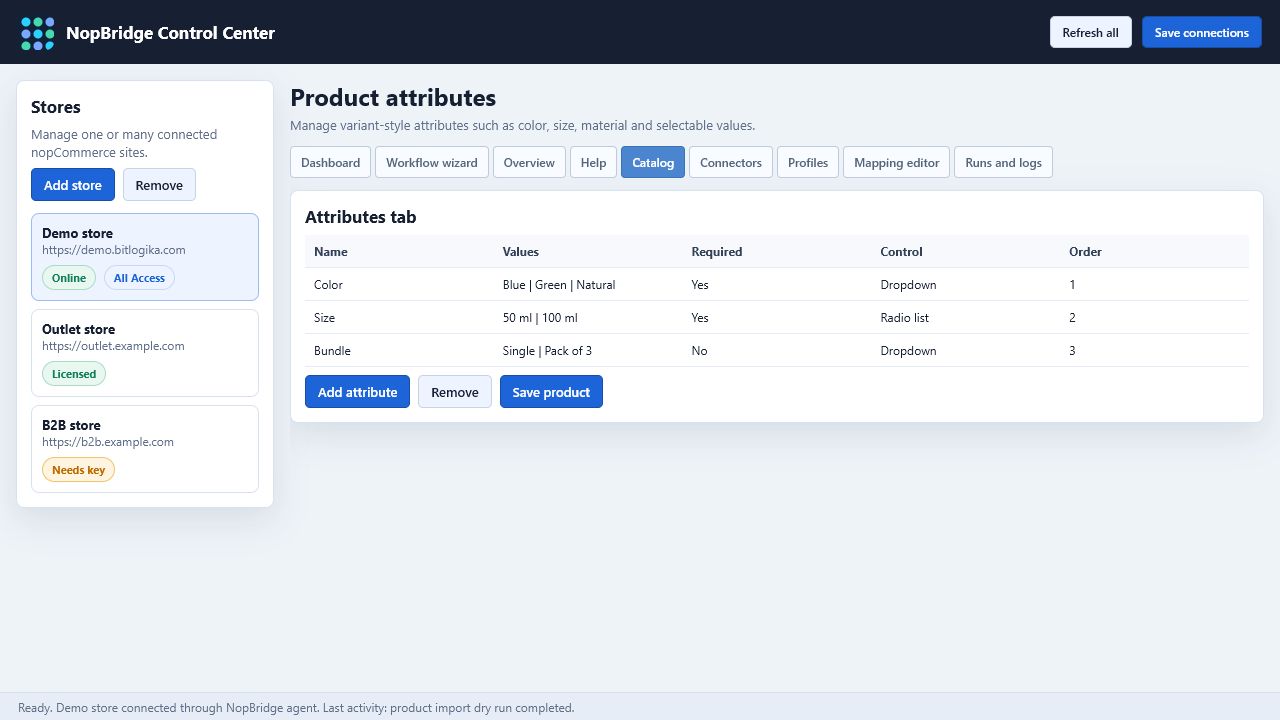
Use attributes for:
- Color.
- Size.
- Material.
- Capacity.
- Packaging.
- Bundle options.
For imported attributes, mapping rules should decide whether values are created, reused, split, normalized, or skipped.
Specification Attributes
Specification attributes are facts and filters.
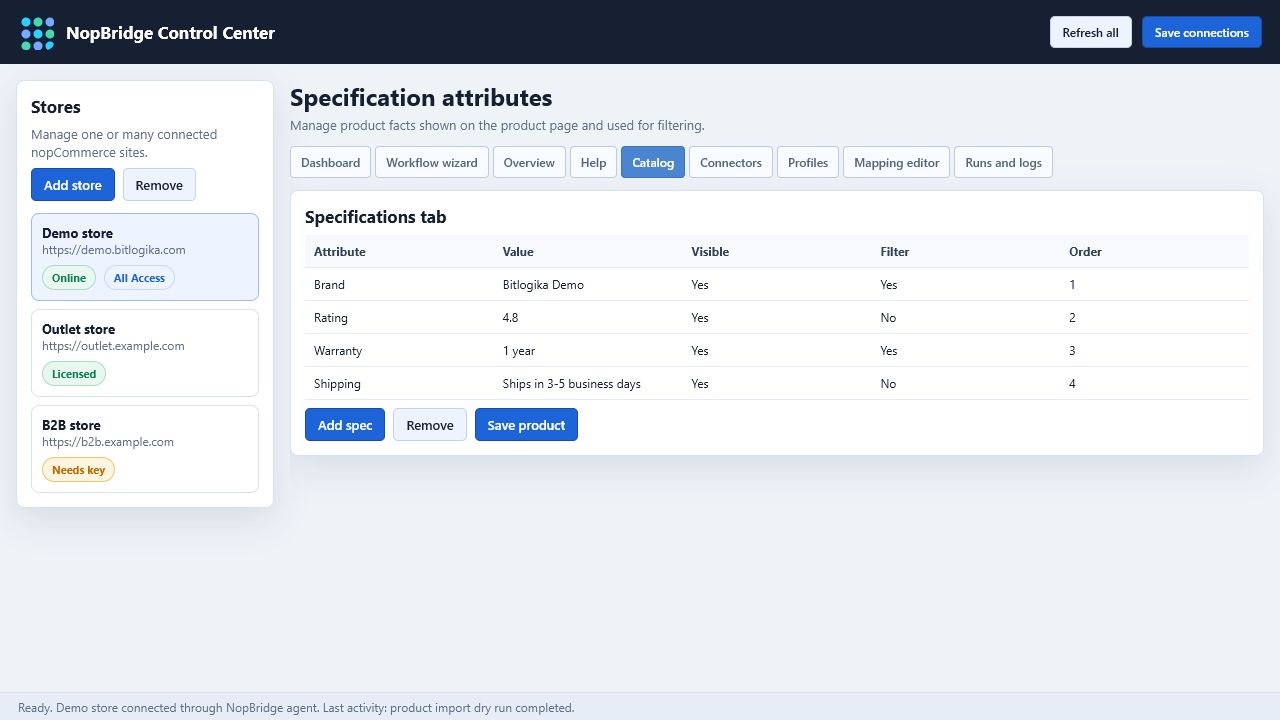
Use specifications for:
- Brand.
- Rating.
- Warranty.
- Shipping information.
- Return policy.
- Weight.
- Dimensions.
- Availability status.
Keep specification names consistent. Avoid creating near-duplicate names such as Warranty, warrantyInformation, and Warranty info unless the mapping intentionally separates them.
Category Editor
The Category tab edits selected category data.
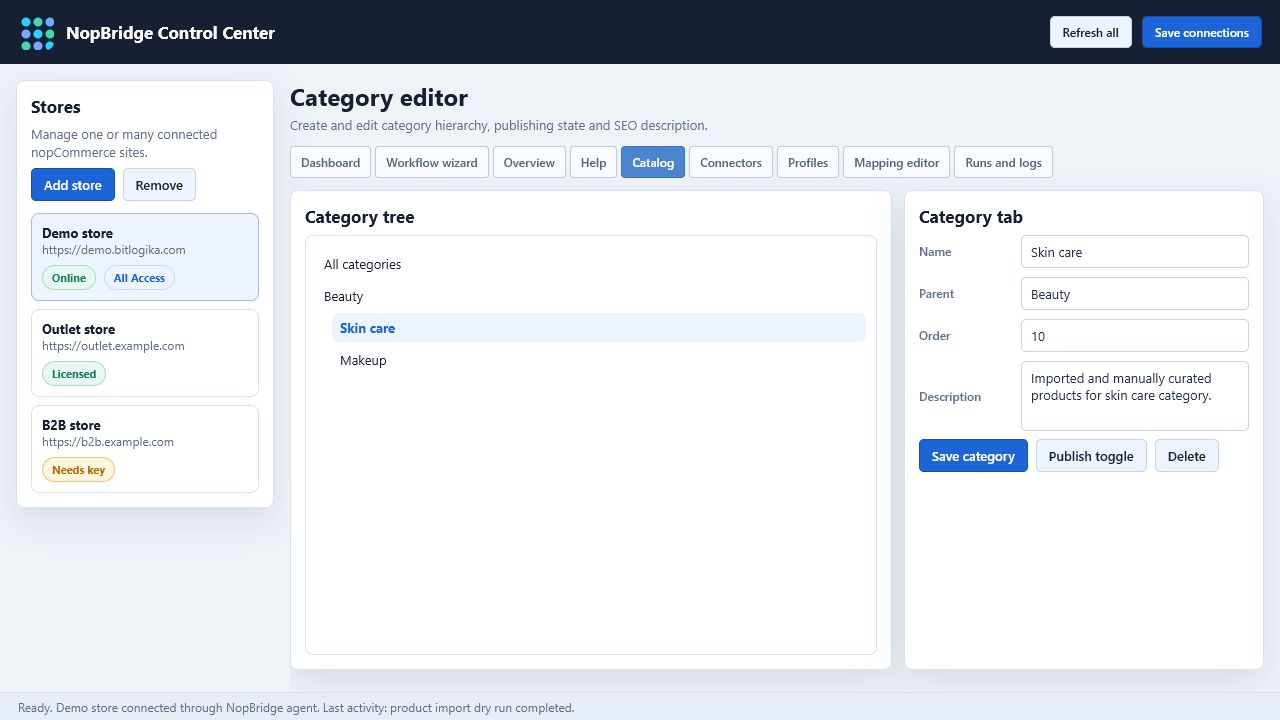
Use it to:
- Create a new category.
- Rename a category.
- Move it under another parent.
- Change display order.
- Publish or unpublish it.
- Edit description and SEO text where supported.
For imports, category mapping can create missing categories. The category editor is then used for manual cleanup and presentation quality.
Connectors
The Connectors tab is the full desktop source editor.
Use it when you need to:
- Add a connector outside the wizard.
- Edit a connector used by multiple profiles.
- Test a connector after credentials change.
- Upload a sample file.
- Re-detect schema.
- Review masked descriptor fields.
Profiles
Profiles are reusable workflows.
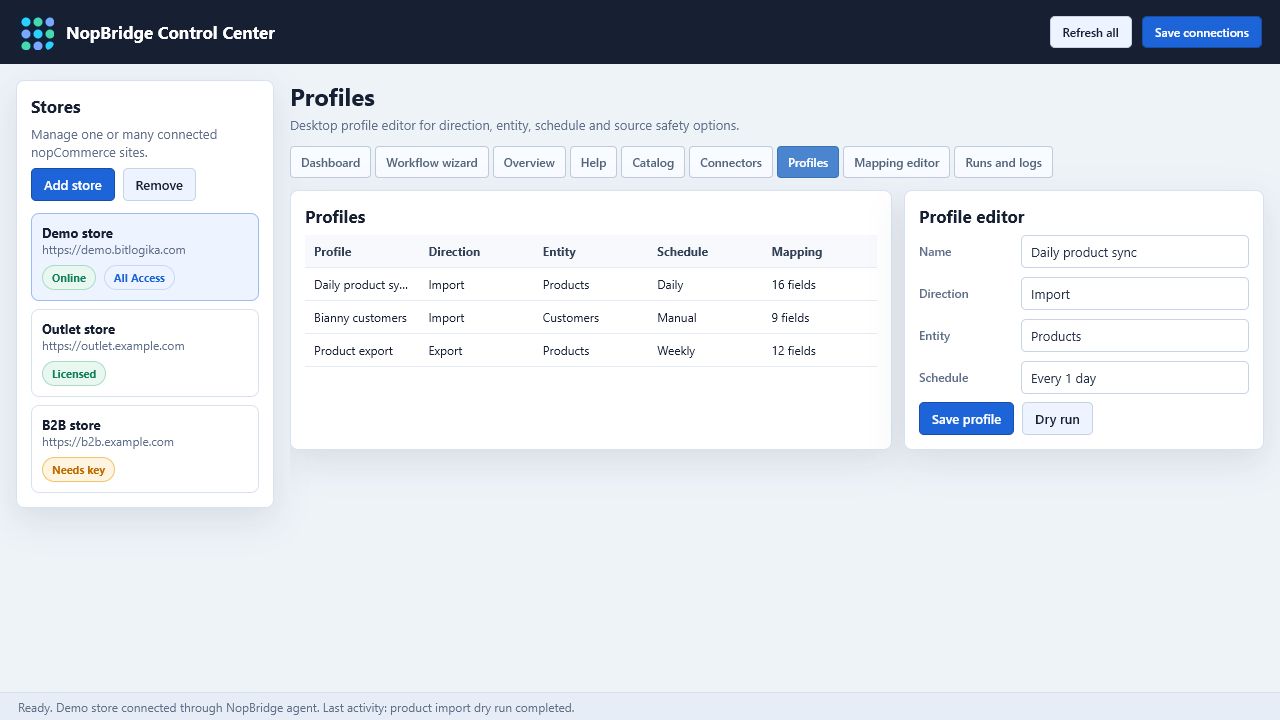
Use the Profiles tab to manage:
- Import profiles.
- Export profiles.
- Product workflows.
- Customer workflows.
- Schedules.
- Source retention rules.
- Notes and operational context.
Separate business processes should usually be separate profiles, even when they use the same connector.
Mapping Editor
The Mapping editor is the advanced workspace for source-to-target mapping.
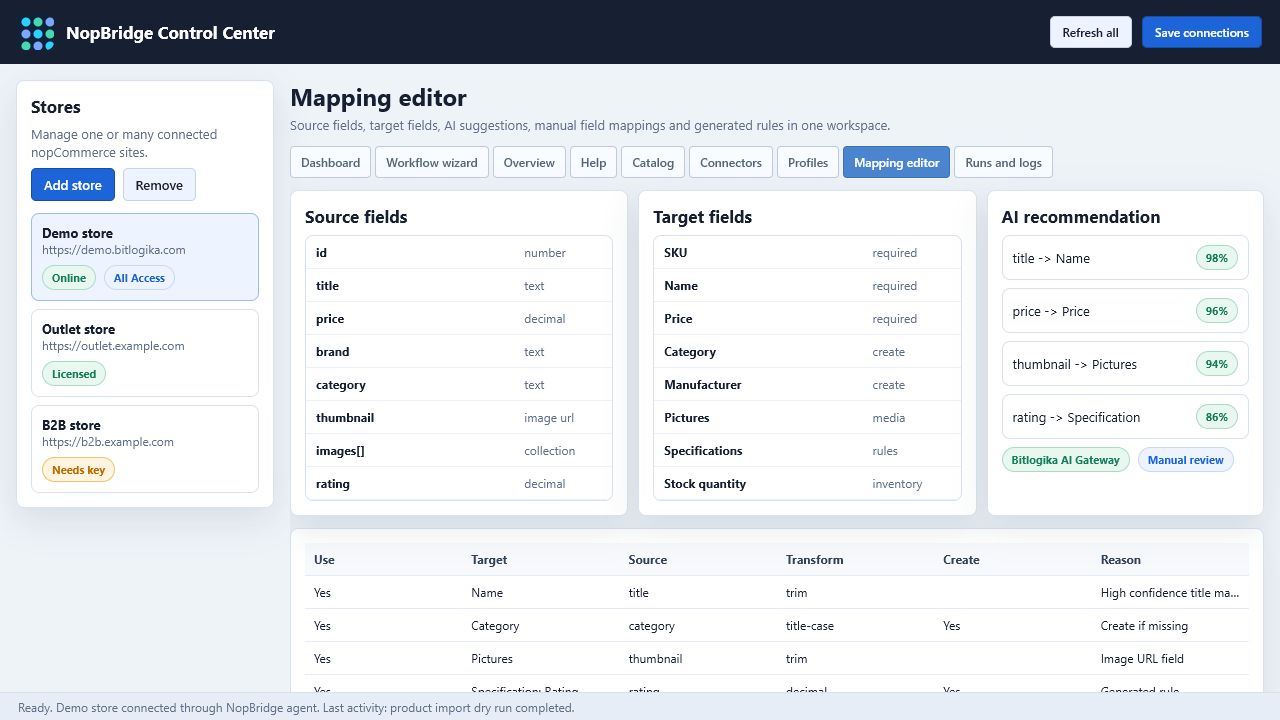
It includes:
- Source fields.
- Target fields.
- AI suggestions.
- Manual field mappings.
- Transform rules.
- Generated rules for product attributes and specifications.
- Create-if-missing flags.
- Review flags and reason text.
Use this tab when the wizard is too compact or the mapping requires detailed rule editing.
Runs And Logs
The Runs and logs tab is the traceability workspace.
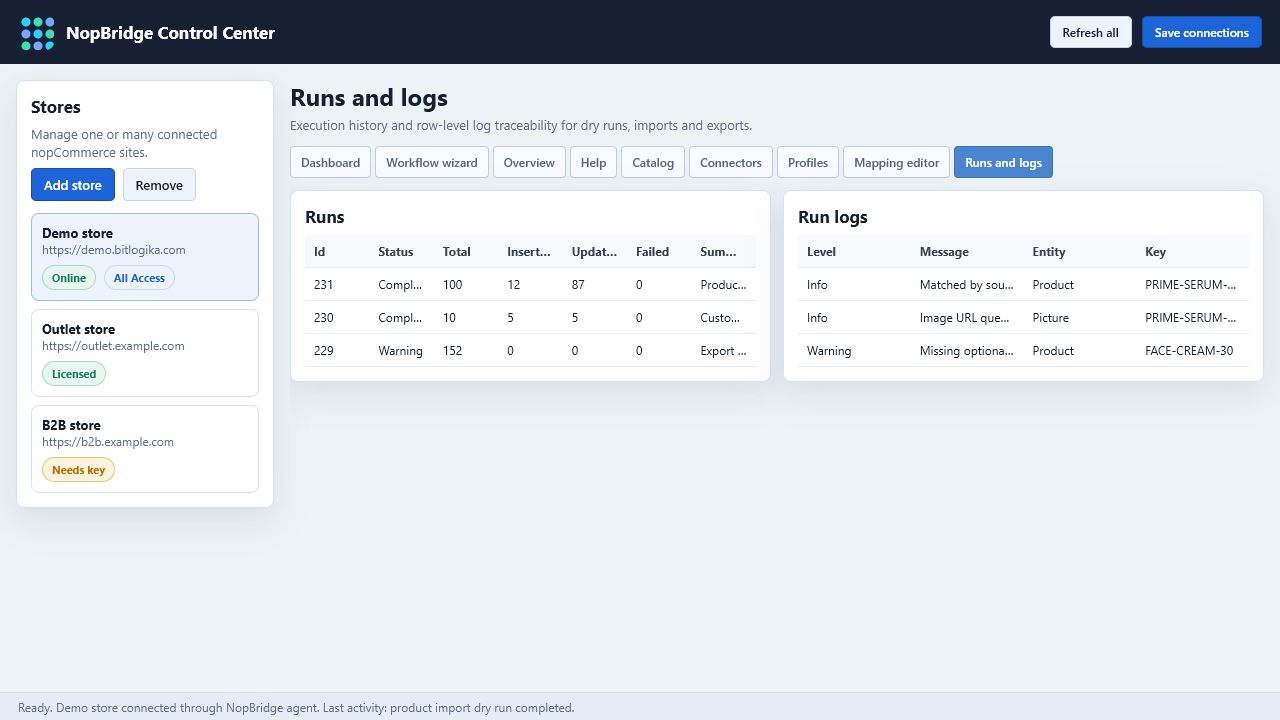
Use it to:
- Review dry run history.
- Review live import/export history.
- Load logs for a selected run.
- See row-level warning/error messages.
- Confirm duplicate matching.
- Confirm image handling.
- Confirm category, attribute, and specification creation.
For support, ask for the store name, profile name, run ID, and the first warning or error message.
Recommended Daily Workflow
- Open NopBridge Control Center.
- Select the store.
- Check Dashboard for connection, license, and update status.
- Open Runs and logs if a scheduled job needs attention.
- Open Catalog to review imported products.
- Use drag and drop or bulk actions for quick catalog cleanup.
- Open Mapping editor only when the source shape or business rules changed.
- Use the wizard for new workflows or support-guided setup.
Troubleshooting
If NopBridge Control Center cannot connect:
- Confirm the store URL is valid.
- Confirm the NopBridge plugin is installed and enabled.
- Confirm the agent key is correct.
- Confirm the agent endpoint is enabled.
- Confirm the license allows NopBridge Control Center.
- Confirm firewall, SSL certificate, and port availability.
- Open Runs and logs for store-side errors.