Web plugin screens
This guide explains the NopBridge web plugin screen by screen. Use it when you want to understand what each tab is for, what to fill in, and how the screens connect into one import or export workflow.
The main idea is simple: Dashboard shows health, Import wizard guides new work, Sources describe where data comes from, Profiles describe what to do with that data, AI mapping creates the first mapping draft, and Runs/Logs prove what happened.
Dashboard
The dashboard is the operational landing page for store administrators.
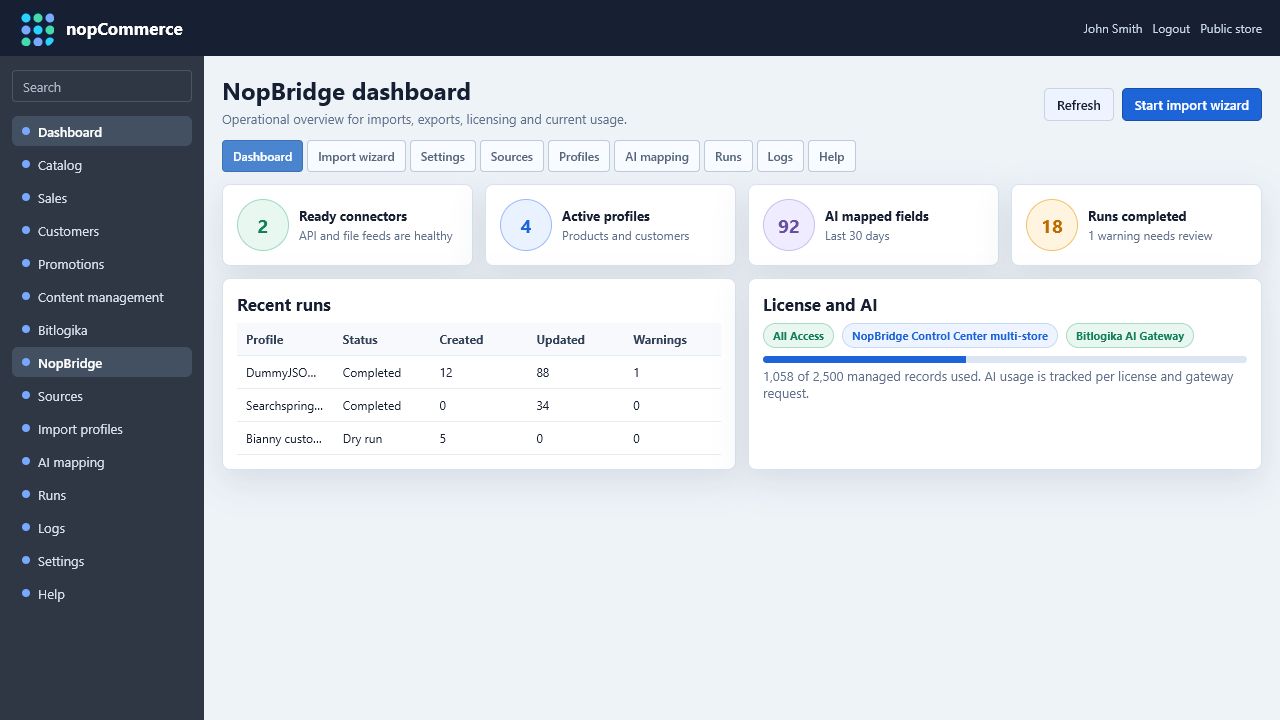
Use it to check:
- License and plan status.
- Remaining usage against plan limits.
- Connector health.
- Recent dry runs and imports.
- Whether AI mapping used the Bitlogika AI Gateway or a fallback path.
- Whether NopBridge Control Center access is enabled for the current store.
The dashboard should be the first place to look when a user says "nothing imported" or "AI did not map anything". It gives the shortest route to the relevant source, profile, run, or log.
Import Wizard
The import wizard is the recommended path for a first workflow. It keeps the administrator inside one guided flow instead of forcing them to jump between tabs.
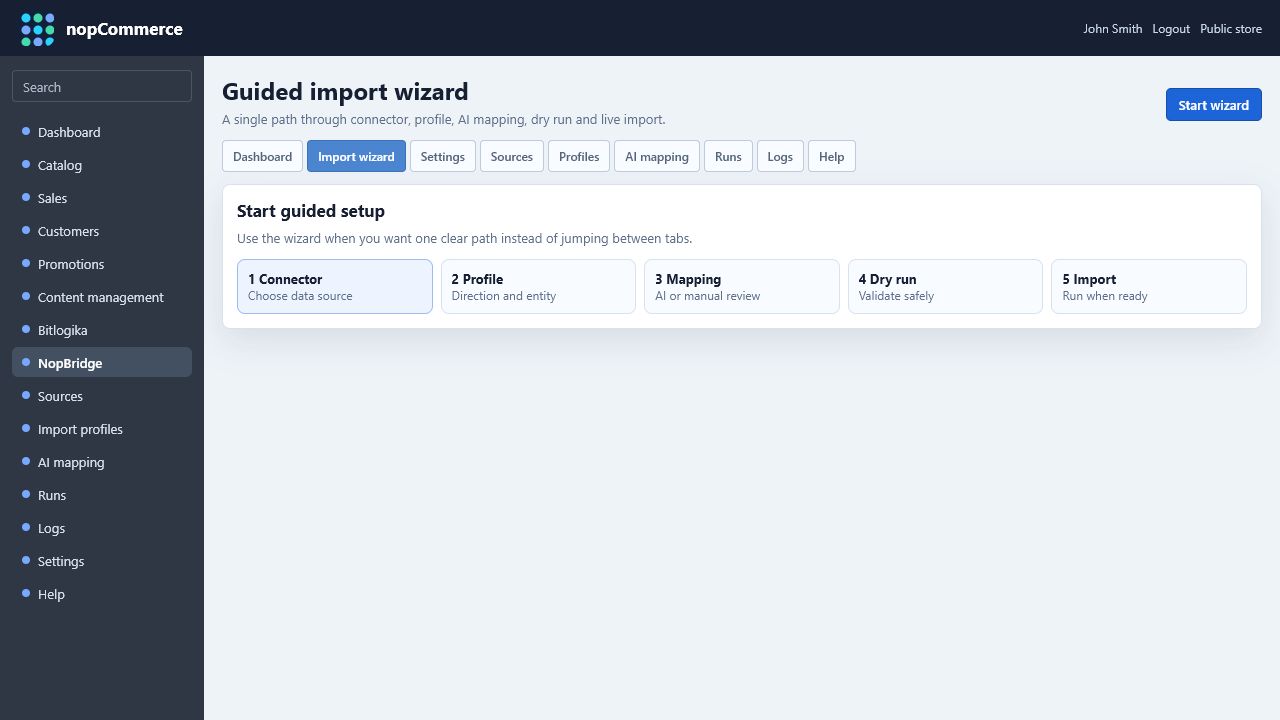
The wizard has five steps:
| Step | Purpose | Result |
|---|---|---|
| Connector | Choose file, API, FTP/SFTP, cloud, object storage, or database source | Source is saved and tested |
| Profile | Choose import/export, entity, schedule, and safety options | Repeatable workflow is saved |
| Mapping | Generate AI mapping or edit manually | Field mapping and rules are saved |
| Dry run | Validate create/update/skip results without changing catalog data | Import is proven before live run |
| Live import | Execute the real operation | Products, customers, or exports are written |
Step 1: Connector
Choose the data source, format, authentication, root path, and schema options. The same connector form is used by the full Sources tab.

Good connector practice:
- Use a clear source name such as
Supplier API products. - Keep secrets in a credential reference, not directly inside the descriptor.
- Test API/FTP/cloud connections before mapping.
- Let NopBridge detect the typed source schema from real sample rows.
- Confirm that nested JSON/XML paths are flattened into readable field paths.
Step 2: Profile
The profile decides what the connector will do.

Important profile fields:
| Field | Meaning |
|---|---|
| Direction | Import or export |
| Entity | Products, Customers, or another licensed workspace |
| Source | Connector used by this workflow |
| Schedule | Manual, hourly, daily, or weekly |
| Run only if source changed | Avoids unnecessary repeated imports |
| Backup source before import | Keeps a dated copy of source file when applicable |
| Delete source after successful import | Useful for drop-folder style workflows |
For first tests, keep scheduling disabled and run manually until the dry run is clean.
Step 3: Mapping
Mapping connects source fields to nopCommerce target fields and rules.
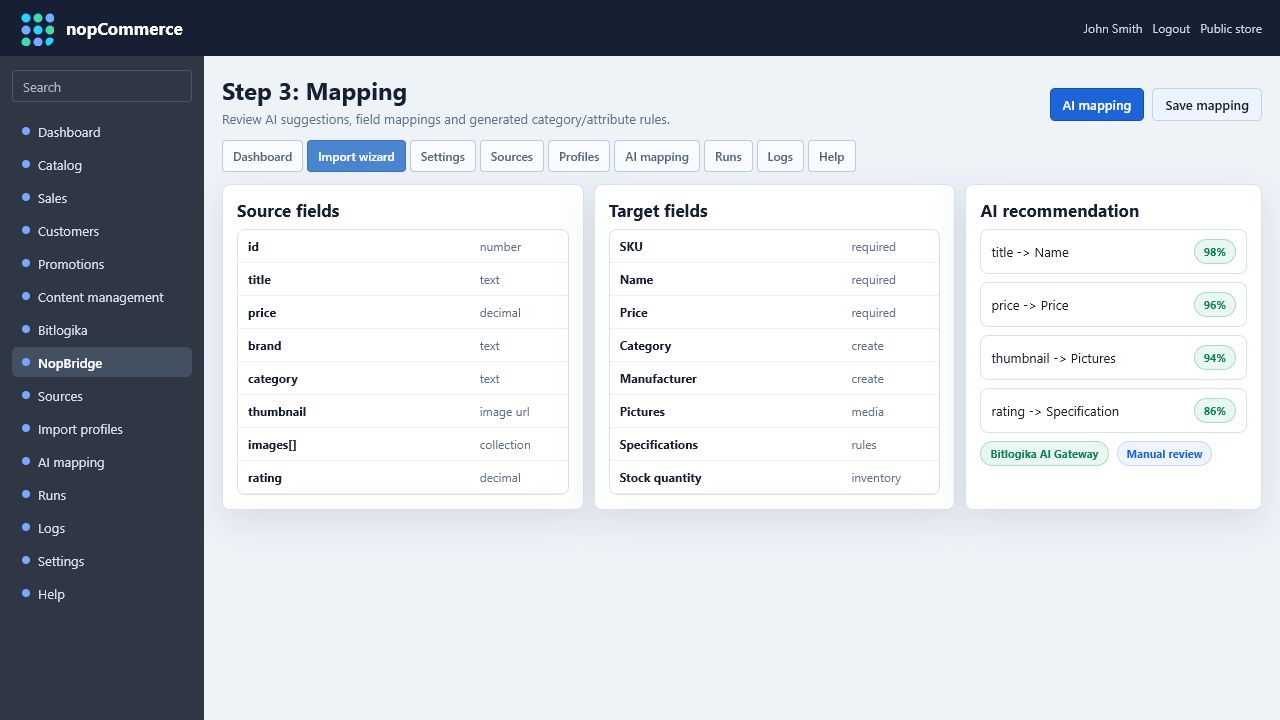
The mapping screen has three important parts:
- Source fields: detected fields, types, and samples from the source.
- Target fields: nopCommerce fields available for the selected entity.
- AI recommendation: generated field suggestions with confidence and provider visibility.
For product imports, mapping should cover more than basic fields. A strong production mapping usually includes SKU/source identity, name, price, category, manufacturer, stock, pictures, product attributes, and specification attributes.
Step 4: Dry Run
Dry run validates the import without changing nopCommerce data.
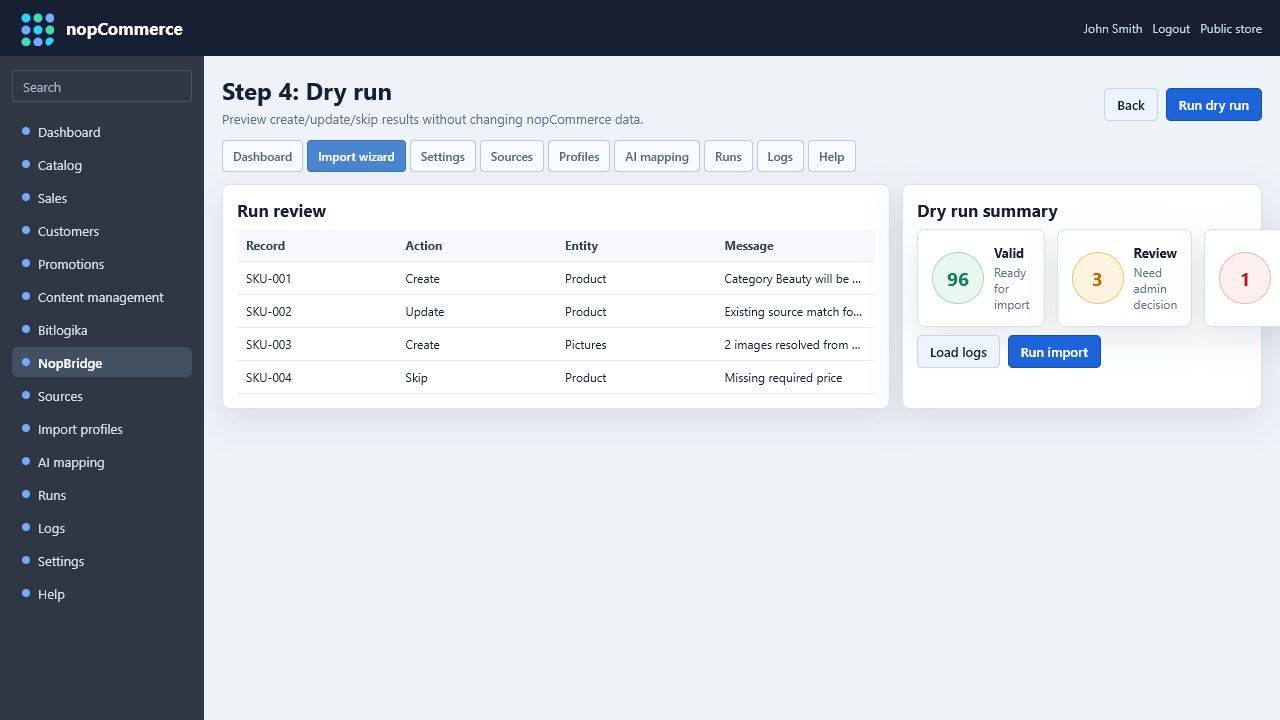
Review:
- Created records.
- Updated records.
- Skipped records.
- Missing required values.
- Category creation.
- Attribute/specification creation.
- Picture resolution.
- Duplicate matching.
If dry run looks wrong, return to mapping before running the live import.
Step 5: Live Import
The final step starts the real job.
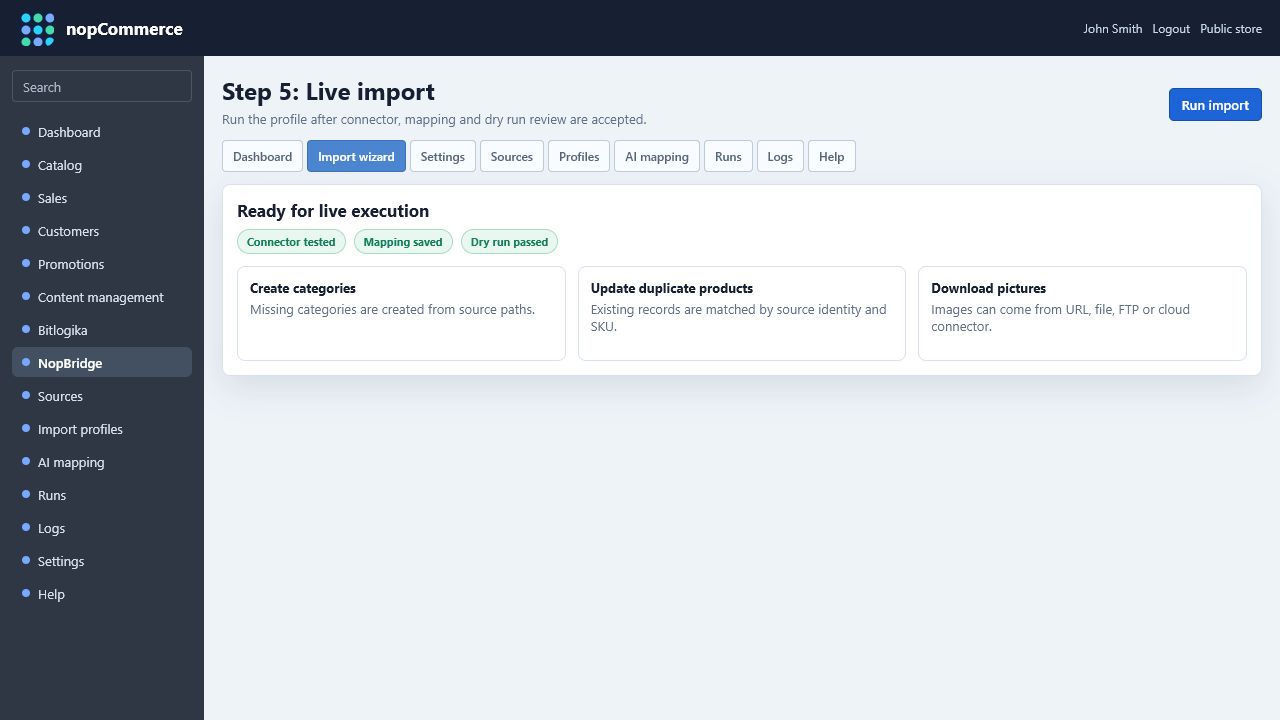
Only run live import after the connector is tested, mapping is saved, and dry run results are acceptable. Repeated runs should update existing records by source identity or SKU instead of creating duplicates.
Sources
The Sources tab is the connector inventory.

Use it to:
- See all configured connectors.
- Check source type and format.
- Confirm field count and last analysis time.
- Open a source for editing.
- Add new sources for future profiles.
Source Editor
The source editor defines connection settings and typed schema.
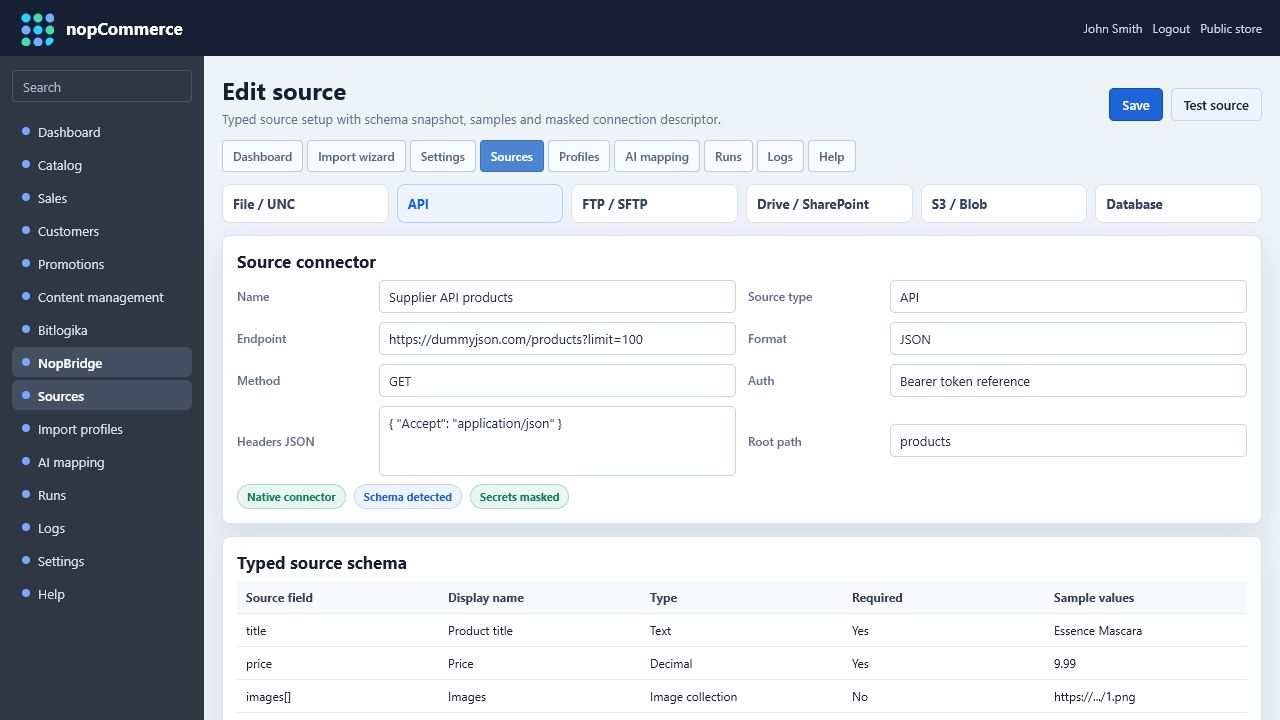
The top connector buttons select the source type:
| Type | Typical use |
|---|---|
| File / UNC | CSV, XLSX, XML, JSON on local disk or network share |
| API | HTTP/HTTPS endpoints with method, headers, body, token reference, and root path |
| FTP / SFTP | Supplier drop folders or scheduled partner feeds |
| Drive / SharePoint | Business files managed in cloud document storage |
| S3 / Blob | Object storage feeds or generated export targets |
| Database | SQL-style source reads where direct database access is configured |
Typed schema tells NopBridge what each source field means. It improves AI mapping, manual review, validation, and dry run explanations.
Profiles
Profiles are saved workflows.
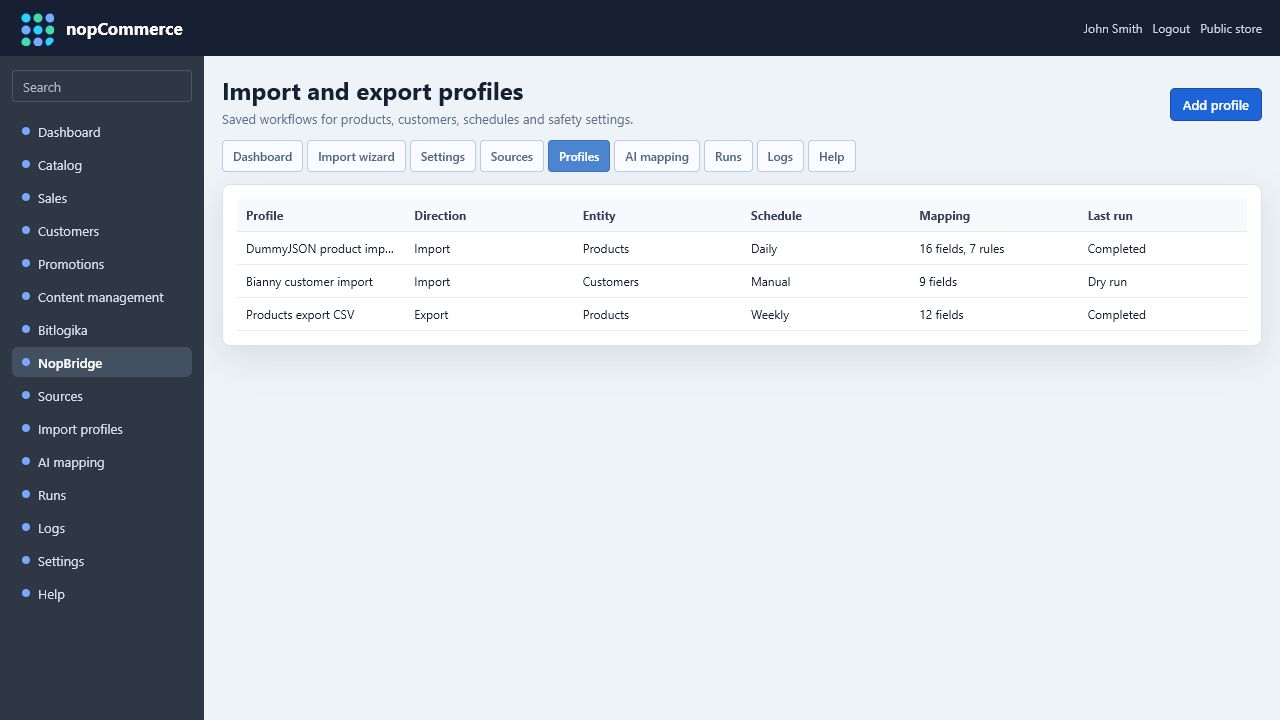
A profile combines:
- Source connector.
- Direction.
- Entity.
- Schedule.
- Source-change check.
- Backup/delete options for file workflows.
- Mapping and generated rules.
Use separate profiles for separate business workflows. For example, keep supplier product import, customer migration, and product export as different profiles even if they use the same source.
AI Mapping
The AI mapping tab is where administrators can generate and review mapping recommendations.
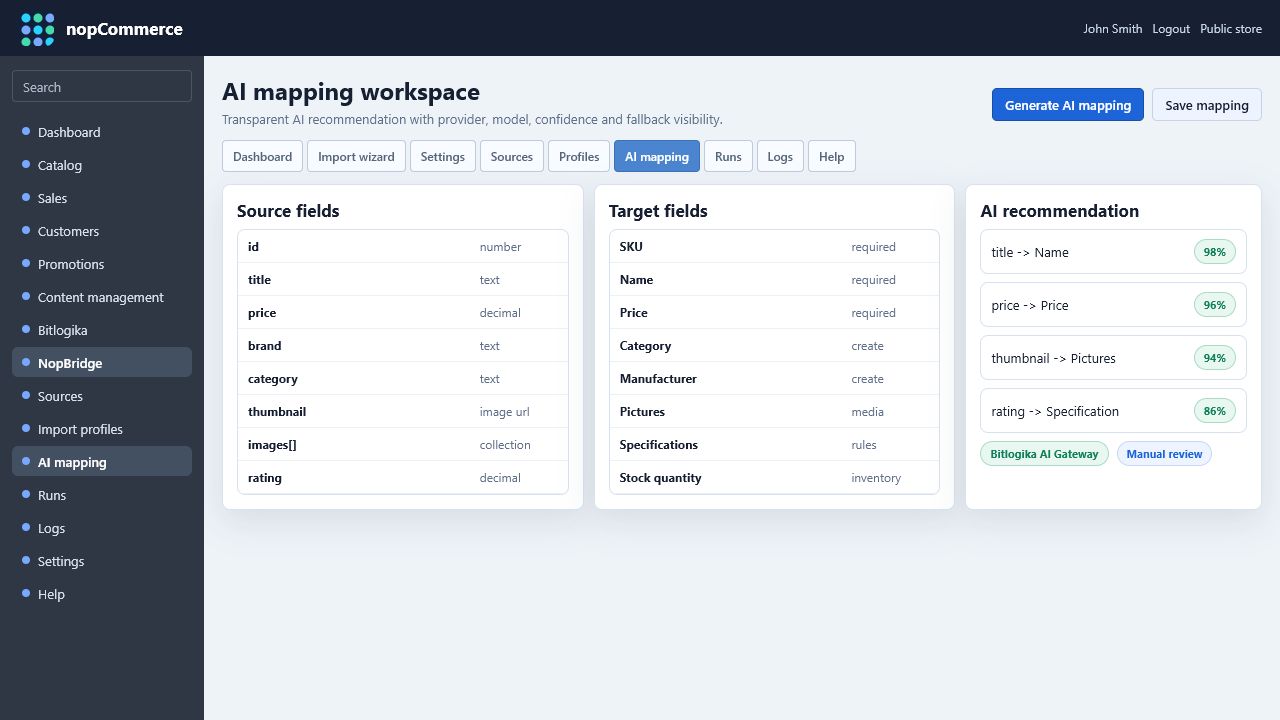
The screen should clearly show:
- AI provider: Bitlogika AI Gateway, Direct OpenAI, or Heuristic fallback.
- Model or Bitlogika model alias.
- Confidence score.
- Field-level suggestion.
- Generated rules for attributes, specifications, categories, and pictures.
- Fields requiring manual review.
AI mapping creates the first draft. The administrator still owns the final mapping decision.
Runs
Runs show every dry run, import, and export execution.
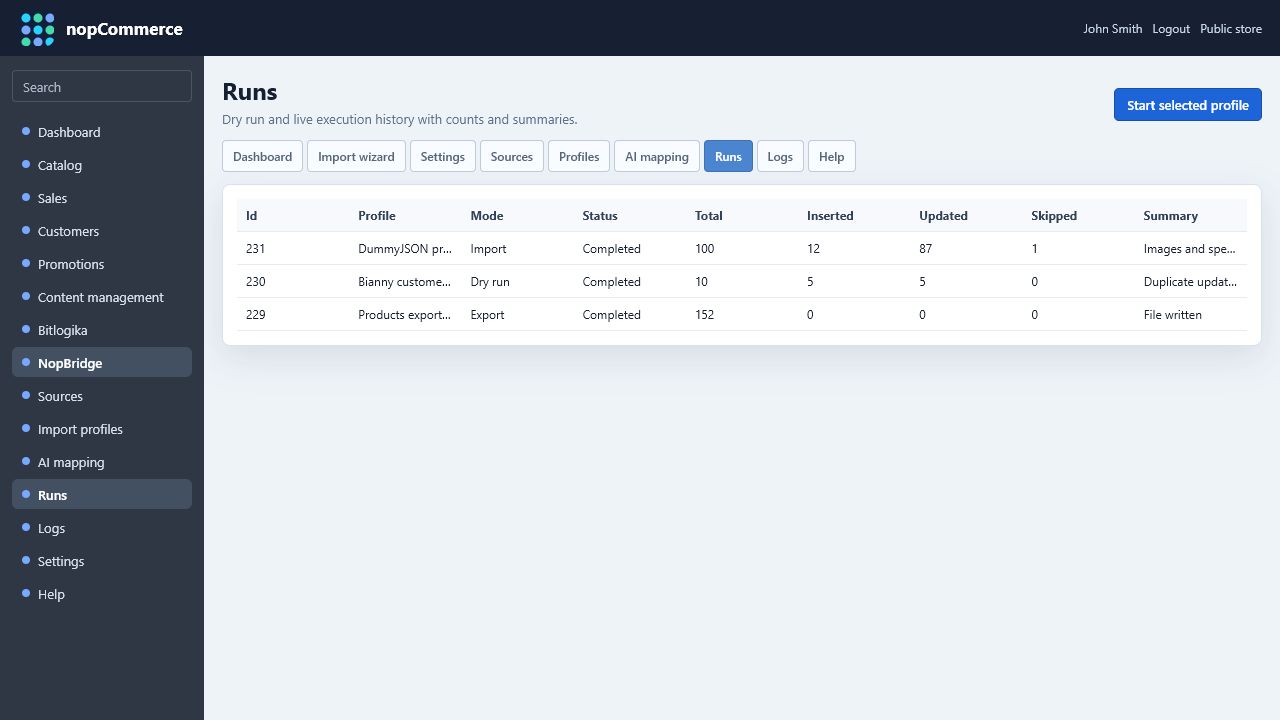
Use runs to verify:
- Total records read.
- Inserted count.
- Updated count.
- Skipped count.
- Failed count.
- Run mode: dry run or live run.
- Summary of what happened.
For support, a run ID plus logs usually gives enough traceability to understand a problem.
Logs
Logs explain the run at row and entity level.
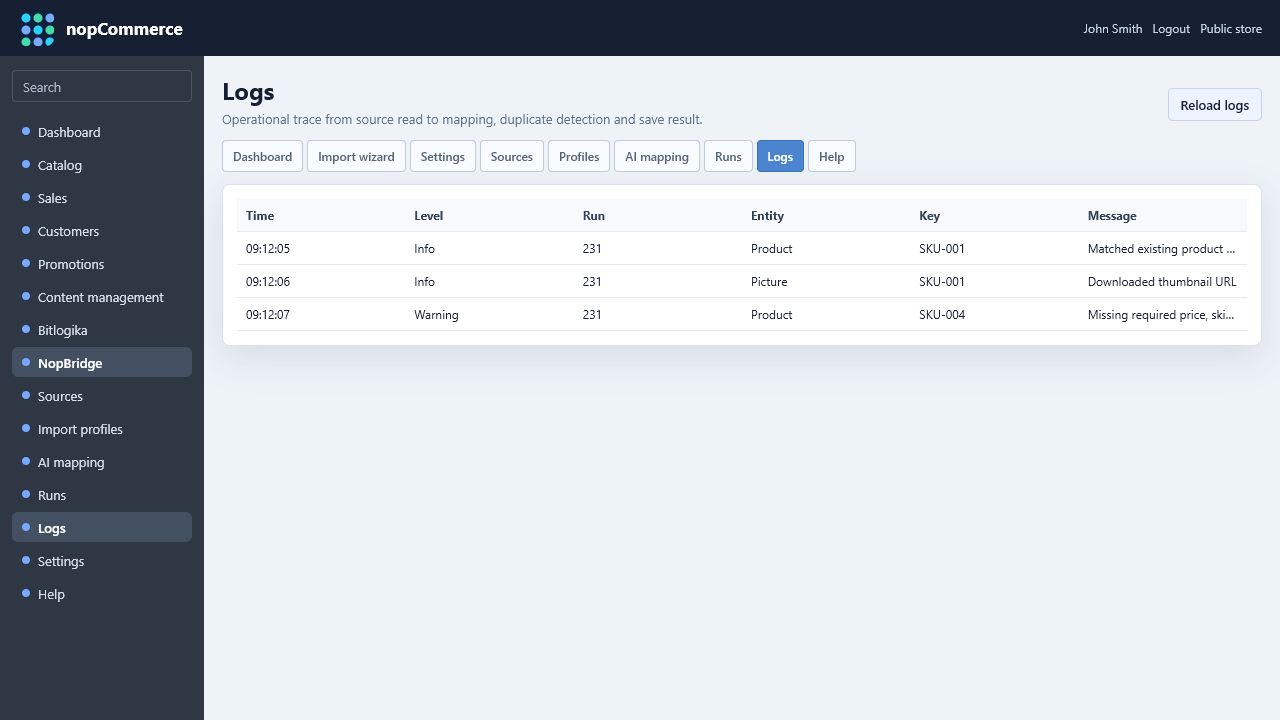
Useful log messages include:
- Source read started/completed.
- Duplicate matched by source identity or SKU.
- Category created or reused.
- Picture downloaded or skipped.
- Attribute/specification created or reused.
- Required field missing.
- External connector/authentication error.
Logs should never expose raw API keys, passwords, or tokens. Use masked values and credential references.
Settings
Settings control license, AI gateway, agent API, update checks, and connector defaults.
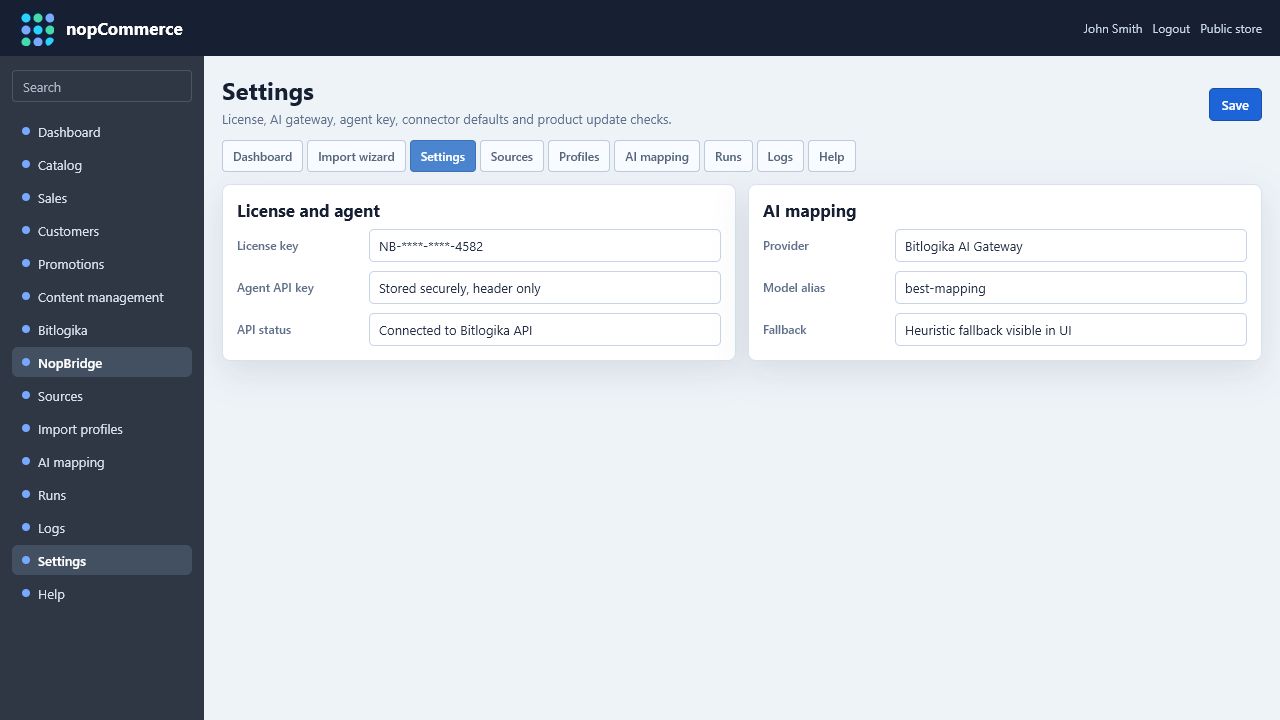
Recommended production settings:
- Validate license through Bitlogika API.
- Use
X-NopBridge-Agent-Keyfor NopBridge Control Center access. - Keep secrets out of visible descriptors.
- Show AI provider and fallback status to administrators.
- Keep update checks enabled when outbound access is allowed.
- Log warning-level messages when API/license services cannot be reached.
Help
The Help tab gives administrators quick explanations without leaving nopCommerce.
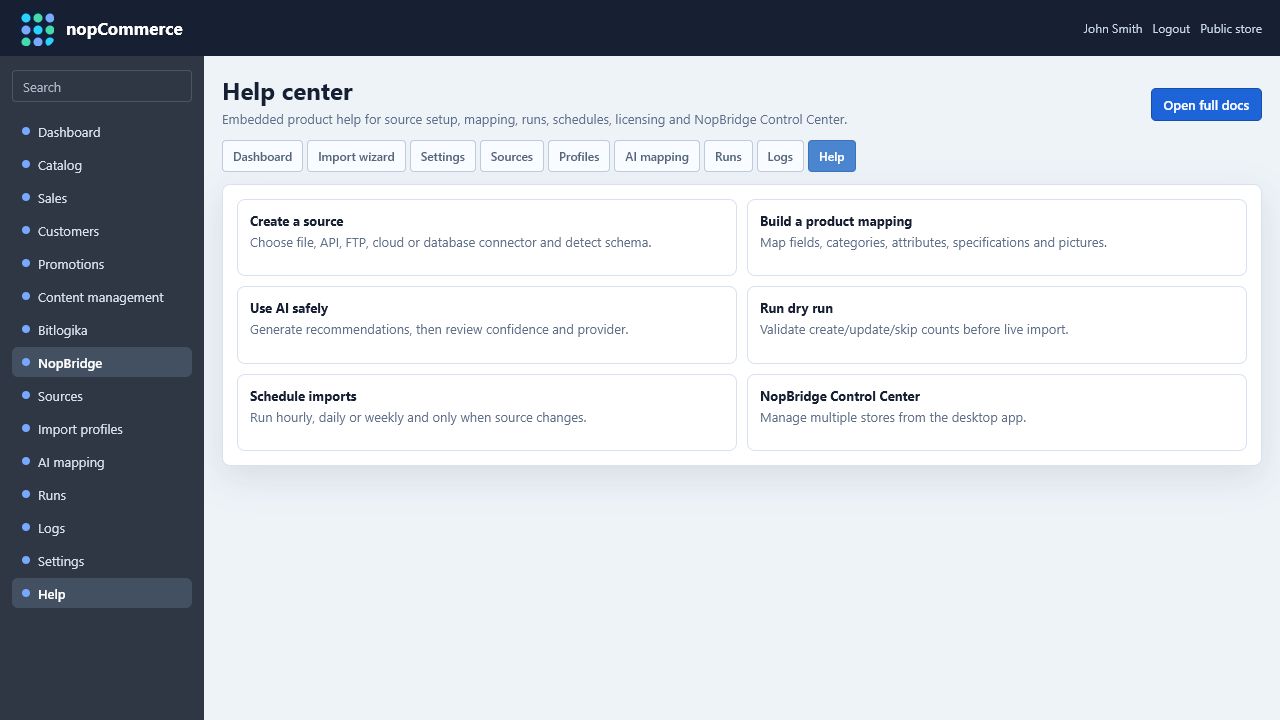
Good help content should cover:
- Creating a source.
- Understanding typed schema.
- Building product/customer mapping.
- AI mapping review.
- Dry run and live run.
- Schedules and source retention.
- Licensing and limits.
- NopBridge Control Center connection.
For deeper setup, link to the full Bitlogika documentation pages.